Thursday, April 15, 2010

My story, my journey as a photographer... (Part One)

Long time no updates.

Oh yeah. I almost forgot to tell about myself. Lot of peoples said that I started my journey with DSLR. That's wrong. So, today I want to tell about my interest in photography since I was 12 years old.

(Part One of My Story)

On mid-year of 2003 (I was 9 that time), my father bought a new compact digital camera which that is the first time ever my father using digital camera. Before this, my father only uses 35mm film camera. Funny right? Haha. That time, nothing interest me but computer video games. When I was twelve, I started to thinking about my future. What do I interesting at? The questions solved when my father passed his Mustek GSmart D30 Digital Camera to me since he bought the Sony Handycam. Yeah! I've finally found my hobby!

Day after day, I explore almost a lots of things using this 'cute' camera. This 3 megapixels cameras captured an images as good as Holga 135BC camera.


and some of picture taken with this camera:


Yeah. I know it's ugly. Haha. I'm noob that time. No skills, no settings, and even the compose also OUT! But at the end of 2007, I was hoping to buy a new compact camera around mid of 2008. That's not happened in mid-year of 2008 because in August 2008 I was surprised with something that I didn't wish for.

END of Part One.

Wednesday, April 7, 2010

Tips of the Day: Rule of Thirds


The “Rule of Thirds” one of the first things that budding digital photographers learn about in classes on photography and rightly so as it is the basis for well balanced and interesting shots.

The basic principle behind the rule of thirds is to imagine breaking an image down into thirds (both horizontally and vertically) so that you have 9 parts. As follows.


As you’re taking an image you would have done this in your mind through your viewfinder or in the LCD display that you use to frame your shot.

With this grid in mind the ‘rule of thirds’ now identifies four important parts of the image that you should consider placing points of interest in as you frame your image.

Not only this – but it also gives you four ‘lines’ that are also useful positions for elements in your photo.

The theory is that if you place points of interest in the intersections or along the lines that your photo becomes more balanced and will enable a viewer of the image to interact with it more naturally. Studies have shown that when viewing images that people’s eyes usually go to one of the intersection points most naturally rather than the center of the shot – using the rule of thirds works with this natural way of viewing an image rather than working against it.

An Example:


Sources: http://digital-photography-school.com/rule-of-thirds

Friday, April 2, 2010

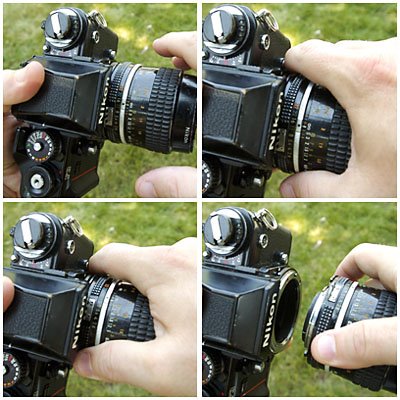
Tips of the Day: How to change DSLR lens quickly?


In an event it is impossible to take the picture with the only lens. Sometimes we have to change it. For example, the wedding ceremony photo shoot session which some photographer like to take candid pictures of the people. It is imposible to take a candid pictures with short zoom lens or kitlens like 18-55mm, 28-80mm and 16-80mm. Except when you have the wide telephoto lens like: eg. 18-250mm, 28-200mm, and 28-300mm. To change the lens, you will need to follow this 4 simple steps:

1) Hold your camera in your left hand as shown in the upper left part of the top photo. Approach the lens as shown with your right hand open and the right forefinger extended a little.

2) As seen in upper right, when you close your hand around the lens, depress the lens release button with the left side of your right forefinger.

3) Moving onto lower left, rotate the lens clockwise (for Nikon, reverse for Canon & Sony) and let the forefinger slide along the still-depressed release button.

4) Finally, as seen at lower right, the lens slides smoothly off of the camera and leaves with your right hand.

Hope this helps! Thanks for viewing!